Quick Fix for bellows with Light Leaks
Methods for fixing bellows
Vintage camera bellows often have light leaks in the form of pin holes or small tears. The best way to fix them is of course to replace them. This is a daunting task for even the bravest of camera repairers. Another way is to coat the bellows with some lightproof substance. Favourites for this purpose are 'Brush on Electrical Tape' or fabric paint. These are both messy and time-consuming and are a permanent modification of the camera.
Where a camera is going to mainly used for display, but you want to try it out now and again, the simplest solution is to line the inside of the bellows with a solid cone made from black card.
When the bellows are lined in this way, the camera can be returned to its original state by simply removing the liner. Unfortunately, with the liner in place, the folding camera needs to remain erected until all photos have been taken.
Making the Liner Cone
You will need some black card, a pencil, a ruler, set square, a pair of compasses, scissors and clear tape.
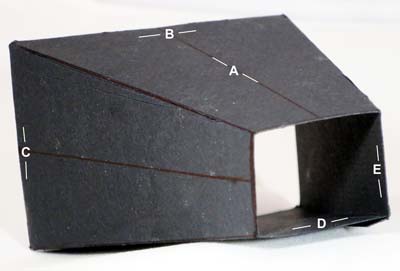
First measure the internal dimensions of the bellows. Measure the distance from the lens plate to the centre of the longest side on the film plane (A). Then measure the length of the opening in the film plane - long side (B), short side (C). Finally measure the inside measurements of the bellows at the lens plate - long side (D), short side (E).
Draw a line on the black card of length A. This will be the centre line of Panel 1. Draw a line of length B centered on the top of line A and at right angles to line A. Draw a line of length C centered on the bottom of line A and at right angles to line A. Now complete Panel 1.
Set some compasses to D/2 and draw an arc centred on the top right of Panel 1. Now set the compasses to E/2 and draw an arc centred on the bottom right of Panel 1. Draw a line at a tangent to both arcs to form the centre line of Panel 2. Draw a line from the centre line, and at right angles to the centre line, to the top right of Panel 1. Draw a line from the centre line, and at right angles to the centre line, to the bottom right of Panel 1. Extend the top line by D/2 and the bottom line by E/2. Complete Panel 2.

A similar procedure is used to form Panel 3. Set some compasses to B/2 and draw an arc centred on the top right of Panel 2. Now set the compasses to C/2 and draw an arc centred on the bottom right of Panel 2. Draw a line at a tangent to both arcs to form the centre line of Panel 3. Draw a line from the centre line, and at right angles to the centre line, to the top right of Panel 2. Draw a line from the centre line, and at right angles to the centre line, to the bottom right of Panel 2. Extend the top line by B/2 and the bottom line by C/2. Complete Panel 3. Check that the centre line of Panel 3 has a length of A. If not, review your construction.
Now form Panel 4. Set some compasses to D/2 and draw an arc centred on the top right of Panel 3. Now set the compasses to E/2 and draw an arc centred on the bottom right of Panel 3. Draw a line at a tangent to both arcs to form the centre line of Panel 4. Draw a line from the centre line, and at right angles to the centre line, to the top right of Pane 3. Draw a line from the centre line, and at right angles to the centre line, to the bottom right of Panel 3. Extend the top line by D/2 and the bottom line by E/2. Complete Panel 4.
Add a tab to stick the cone together.
Cut out the template. Score the lines between the panels with the back of the scissors to help bend the form. Bend the form into shape, with the construction lines on the outside, and stick it together to produce the cone
Put the cone into the camera and gently tuck the end of the cone below the film plate.
Job Done
Check out how I got on taking photos with the Rajar No.6, having the liner in place - Rajar No.6