How To Develop C41 Colour Film
Introduction
Most Colour Negative film uses the C41 process. Colour slides use the E6 process which is not covered here. There are some black & white films (e.g. Ilford XP2) that are developed using C41.
I present a simple method for C41 colour film processing. You'll be surprised at how easy it is to develop colour film. There are thousands, if not millions, of pages dedicated to developing film on the internet describing the intricacies of the craft. These pages might be interesting to experienced film developers but only add to the confusion of first time developers. Follow this simple guide to get on the road to be an accomplished film developer.
What you need (with recomendations)
- Chemicals (Tetenal)
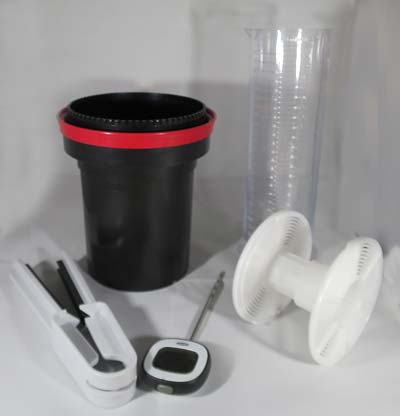
- Developing Tank (Paterson Tank*)
- Changing Bag or Darkroom
- Thermometer (Cooking Thermometer**)
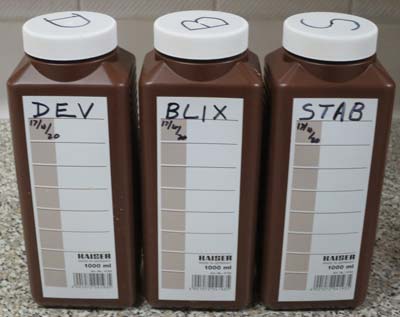
- 3 Storage Bottles (1ltr plastic)
- Measuring Jug (1ltr plastic)
- 600mm Graduate (Paterson)
- Film Opener(for 35mm)
- Scissors (for 35mm)
* There are two Paterson Tanks - Paterson 35mm for single 35mm film or Paterson Universal for 2 x 35mm, 127 or 120/620 films.
** Check your thermometer. Make sure it's clean and pop it in your mouth or under your arm. After a short while it should register about 37°C. If it does not, get another thermometer or call a doctor. 😆

Ilford Photo or Nick & Trick(in the UK), have Film Processing Kits which contains everything you need.
Health and safety
Photographic chemicals are not hazardous when used correctly. Gloves, eye protection and an apron are recommended when mixing chemicals. Always follow the specific health and safety recommendations for each chemical used. Dispose of film developing chemicals responsibly.
Prepare Stock Chemicals
The stock solutions of Tetenal should be prepared in advance. I suggest you make up 1 litre of each working solution. Tetenal comes in 6 parts which must be mixed in the correct proportions.

Tetenal
Colour Developer (CD)
To make up 1 litre of Tetenal Colour Developer, mix 400ml water, 200ml CD part 1, 200ml CD part2 and 200ml CD part3. Mix well and put into dark coloured glass or plastic storage bottles. Mark clearly what's in the bottle.
Bleach Fix (BX)
To make up 1 litre of Tetenal Bleach Fix, mix 600ml water, 200ml BX part 1 and 200ml BX part2. Mix well and put into dark coloured glass or plastic storage bottles. Mark clearly what's in the bottle.
Stabilizer (STAB)
To make up 1 litre of Tetenal Stabilizer, mix 800ml water and 200ml STAB part 1. Mix well and put into dark coloured glass or plastic storage bottles. Mark clearly what's in the bottle.
Film Processing
Load → Pre-wash → Develop → Bleach/Fix → Rinse → Stabilize → Dry
Loading film into tank
This needs to be done in complete darkness. If you have a dark room that's perfect. If you don't have a completely dark space available, you can use a changing bag. A changing bag is a lightproof bag with double cuffs to put your arms in. The double cuffs prevent light getting in while you work in the bag.
The film is loaded onto a spiral. Read the instructions that come with your tank carefully and if possible, use some old exposed film to practice loading the spiral in the light. For 120/127 film simply remove the film from the backing paper before loading it onto the spiral. If you are using 35mm film you will need an opener for the film canister and some scissors to cut the leader straight before loading.
To load the reel, make sure you can feel both notches on the outer edge of the spiral, and that they are aligned. Slide the end of the film under the two notches and pull it gently until it is about a quarter of the way around the reel. Now turn both sides of the reel in an alternate back and forth motion, which will move the film along as you go. You may need to release the curled film a bit so that it can enter the spiral reel. If it won't seem to load, try loading from the other end of the film. It's very tricky so make sure you're in a relaxed mood before you start and are not in any rush.
Once you have loaded the spiral reel, it's plain sailing. Slide the loaded reel right to the bottom of the centre spindal and put it in the tank with the flange downwards. Put the cone lid on and turn it until it locks in place. Your developing tank is now light-tight and it's safe to turn the lights on or take the tank out of the changing bag.
Get your Chemicals up to Temperature
All of the chemicals need to be warmed to 38°C. There are fairly narrow limits specified on these temperatures, the smallest being for the developer at ± 0.3°C. However, in practice, you will get good enough results if you can hold the temperature of the developer within about one ± 1°C - especially if you are scanning your film.
A water bath for the developing chemicals is good enough. The development stage is the most critical but you only have to hold the temperature correct for 3 minutes and 15 seconds. The effect of failing to keep the temperature within limits will be to cause slight colour shifts which will not normally be noticable. Don't let this put you off. Everything is usually fine.
Fill up a large container from your hot tap. This usually will be at about 55-60°C. Put your chemicals in the bath. Relax but keep checking the temperature of the chemicals. When they reach about 37°C, put cold water in the bath to bring the temperature of the bath down to about 39°C. Adjustment either way can now be made by adding hot or cold water to the bath.

Let's Go!
Put on your rubber gloves.
You will need a minimum of 290ml of Developer, Blix and Stabilizer per 35mm film. If you are developing two 35mm film at once using two spirals, then you will need 600ml. You will need 370ml of each for 127 and 500ml of each for 120 film. However, as long as you use more than the minimum, the amount is not critical. I usually simply fill the tank until I can see the liquid at the bottom of the funnel. This means that the films are covered. This is about 300ml for the 35mm tank and 600mm for the universal tank.
Throughout the process, you will need to agitate the tank. This makes sure the film gets evenly covered by the chemicals. Agitate by turning the tank upside down, then back up again. Make sure that the lid is properly on tight before you do this. Go round pressing the lid down and when you think it's OK, go round again.
Pre-wash Mix some hot and cold water in a jug until it is 38°C. Pour it into the tank until it reaches the bottom of the funnel. Put on the lid and agitate for 1 minute. This will bring up the tank and film to temperature. Pour out the water. It will probably be green but don't worry that's normal.
Developer: Set a timer to the time of 3 minutes and 15 seconds. This is the standard time for all films. Slowly pour the developer into the central funnel of the processing tank until it reaches the bottom of the funnel and start the timer. Fit the top to the development tank carefully. Agitate for the first minute. Once the minute is up, bang the bottom of the tank down onto a hard surface. This will dislodge any air bubbles that have built up on the film. Continue agitating by inverting three times for every half minute until the full development time has passed. After each agitation, bang the bottom of the tank onto a hard surface. This is the standard agitation, but some developers may have instructions for other methods.
Blix: As the development time nears the end (5 seconds before) pour out your developer back into its storage bottle. Now immediately pour in your Blix as quickly as possible. Agitate the Blix for a minute and then three inversions every half minute for a total of 4 minutes. You can go over a bit but do not go under. Return the Blix to its storage bottle.
Rinse: Rinse in flowing water with a temperature of 30-40°C and change the water every 30 seconds for a minimum of 3 minutes. Another way to rinse is the fill the tank up to the bottom of the funnel, put on the top and invert 5 times. Pour out the water and fill again. This time invert 10 times. A final rinse of 20 inversions should do it. Empty the tank. Remember that you have a container full of water at about 38°C so use that to save water.
Stabilizer:: Pour in the stabilizer, put on the top and invert continously for 1 minute. Pour out the Stabilizer into it's storage bottle.
Hang to Dry: Hang the film in a dust free area and where drips won't damage the flooring (eg. shower). Wipe the excess water from the film . Use rubber gloved fingers, a chamois leather or squeegees to wipe the excess stabilizer from the film. Use a clip at the top and one at the bottom to help keep the film straight. Drying could take 2-3 hours.
Re-using Chemicals
All the chemicals can be reused. However, after about 4 films it is recommended to increase the development and bleach/fix time. See the Tetenal information sheet for more information.
The chemicals have a shelf life. Used developer will last 6 weeks and open concentrate will last 12 weeks. For bleach/fix and stabilizer see Tetenal information sheet.
Job Done
Check out my instructions on How to Develop Black & White Film.